Hê lô các bạn, những ngày qua các mình nhận được rất nhiều yêu cầu về hướng dẫn cách thêm widget thông báo trên header. Chính vì vậy hôm nay mình sẽ hướng dẫn các bạn cách tạo thông báo như blog của mình.
 |
| Hướng dẫn thêm widget thông báo cho template Median 1.6 |
Hướng dẫn bên dưới đây là hướng dẫn chi tiết cho template Median 1.6 và Median 1.5, các template khác có thể dựa vào một số phần ở hướng dẫn bên dưới để tạo widget thông báo cho blog của mình.
Hướng dẫn:
Template Median UI 1.6
Bước 1: Thêm icon thông báo vào thanh header
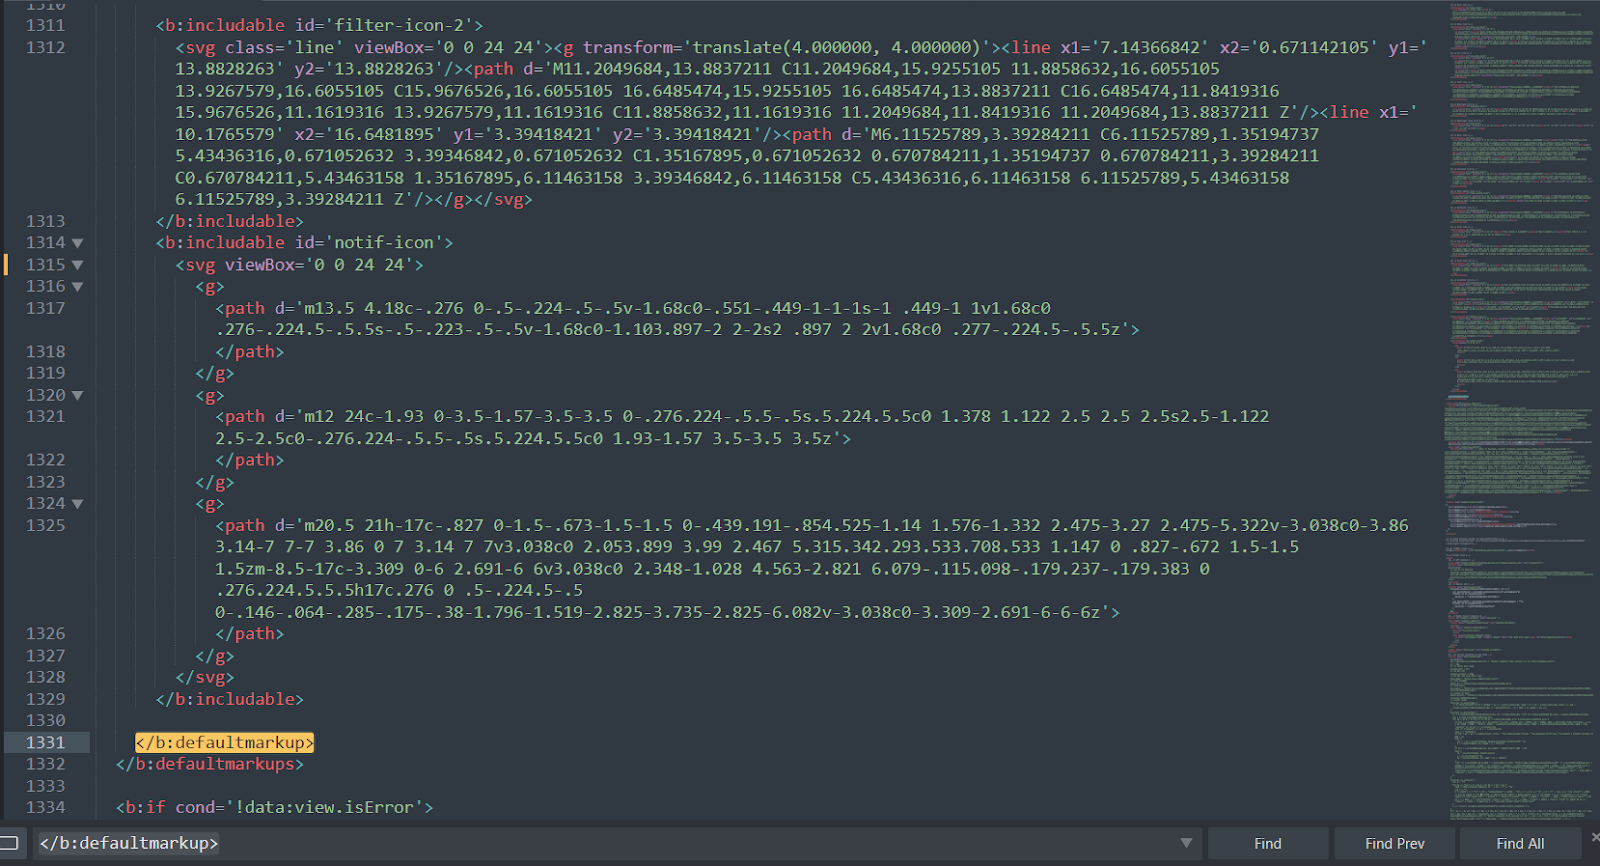
- Tìm thẻ
</b:defaultmarkup>và thêm svg icon thông báo sau vào trước thẻ đóng đó.<b:includable id='notif-icon'> <svg viewBox='0 0 24 24'> <g> <path d='m13.5 4.18c-.276 0-.5-.224-.5-.5v-1.68c0-.551-.449-1-1-1s-1 .449-1 1v1.68c0 .276-.224.5-.5.5s-.5-.223-.5-.5v-1.68c0-1.103.897-2 2-2s2 .897 2 2v1.68c0 .277-.224.5-.5.5z'> </path> </g> <g> <path d='m12 24c-1.93 0-3.5-1.57-3.5-3.5 0-.276.224-.5.5-.5s.5.224.5.5c0 1.378 1.122 2.5 2.5 2.5s2.5-1.122 2.5-2.5c0-.276.224-.5.5-.5s.5.224.5.5c0 1.93-1.57 3.5-3.5 3.5z'> </path> </g> <g> <path d='m20.5 21h-17c-.827 0-1.5-.673-1.5-1.5 0-.439.191-.854.525-1.14 1.576-1.332 2.475-3.27 2.475-5.322v-3.038c0-3.86 3.14-7 7-7 3.86 0 7 3.14 7 7v3.038c0 2.053.899 3.99 2.467 5.315.342.293.533.708.533 1.147 0 .827-.672 1.5-1.5 1.5zm-8.5-17c-3.309 0-6 2.691-6 6v3.038c0 2.348-1.028 4.563-2.821 6.079-.115.098-.179.237-.179.383 0 .276.224.5.5.5h17c.276 0 .5-.224.5-.5 0-.146-.064-.285-.175-.38-1.796-1.519-2.825-3.735-2.825-6.082v-3.038c0-3.309-2.691-6-6-6z'> </path> </g> </svg> </b:includable>
- Tìm section sau trong template
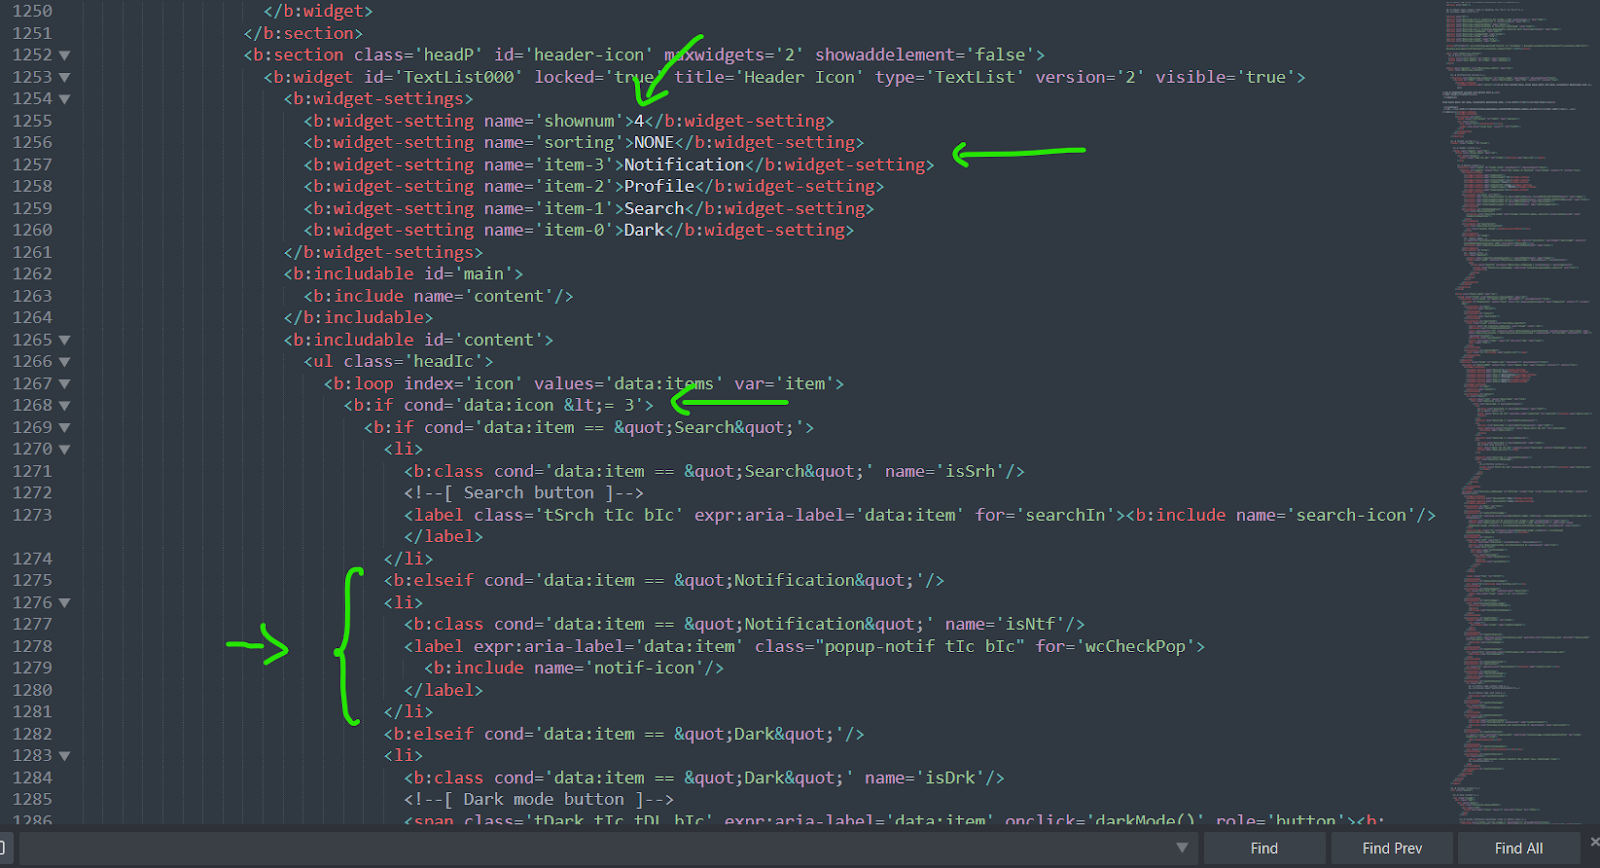
<b:section class='headP' id='header-icon' maxwidgets='2' showaddelement='false'> - Kéo xuống 1 chút sẽ thấy thẻ
<ul class='headIc'>. Các bạn tìm thẻ<b:ifđầu tiên và sửa 2 thành 3 sau đó thêm đoạn code bên dưới vào sau thẻ</li>đầu tiên<b:elseif cond='data:item == "Notification"' /> <li> <b:class cond='data:item == "Notification"' name='isNtf' /> <label expr:aria-label='data:item' class="popup-notif tIc bIc" for='wcCheckPop'> <b:include name='notif-icon' /> </label> </li>
- Sau đó các bạn kéo lên trên phần
<b:widget-settings>và chỉnh sửa một số setting như sau:<b:widget-settings> <b:widget-setting name='shownum'>4</b:widget-setting> <b:widget-setting name='sorting'>NONE</b:widget-setting> <b:widget-setting name='item-3'>Notification</b:widget-setting> <b:widget-setting name='item-2'>Profile</b:widget-setting> <b:widget-setting name='item-1'>Search</b:widget-setting> <b:widget-setting name='item-0'>Dark</b:widget-setting> </b:widget-settings>
- Các bạn có thể chỉnh sửa số thứ tự của item-i để đổi vị trí các icon trên header
- Phần này hơi phức tạp nên mình để một số hình ảnh minh họa ở bên dưới nhé
Bước 2: Thêm HTML Popup thông báo
Các bạn thêm đoạn HTML sau vào sau thẻ <body> vậy là xong bước này.
<!-- [ PopUp Notification ] --> <input id='wcCheckPop' type='checkbox' /> <div class='wcNotif'> <label class='wcNotifClose' for='wcCheckPop'> </label> <div class='wcNotifStart'> <ul> <!-- noti thông báo --> <li style="border: 1px solid;display: flex;border-radius: 12px;flex-direction: row;margin-bottom:10px"> <p style="width: 70%;text-align: center;">Ấn vào nút chuông để nhận thông báo bài viết mới nhất </p> <div class="followBLog" onclick='window.open("https://www.blogger.com/follow.g?blogID=blog-id")'> <i class="fad fa-bells"></i> </div> </li> <!-- noti 2 --> <li> <i><!--Ngày/tháng/năm--></i> - <!-- Tiêu đề --> <input class='wcPopMenu' id='pop-menu2' name='multi-popup' type='checkbox' /> <label class='wcPopMore' for='pop-menu2'> <span class='more'>Xem thêm</span> </label> <div class='content'> <!-- Thêm chi tiết ở đây --> </div> </li> <!-- noti 1 --> <li> <i><!--Ngày/tháng/năm--></i> - <!-- Tiêu đề --> <input class='wcPopMenu' id='pop-menu1' name='multi-popup' type='checkbox' /> <label class='wcPopMore' for='pop-menu1'> <span class='more'>Xem thêm</span> </label> <div class='content'> <!-- Thêm chi tiết ở đây --> </div> </li> </ul> </div> </div> <label class='fullClose' for='wcCheckPop'> </label> <script type='text/javascript'> //<![CDATA[ document.addEventListener("DOMContentLoaded", () => { document.querySelector('.popup-notif').dataset.text = document.querySelector('.wcNotifStart > *').childElementCount }); //]]> </script> <!-- [ End Notification ] -->Bước 3: Thêm CSS
Bên dưới đây là CSS của popup, các bạn dán vào phần css của template và chỉnh sửa các thông báo rồi lưu template là xong
/* --- CSS Popup Notification --- */ #totalNotif_top{position:absolute;top:-9px;left:9px;font-size:8px;font-weight:900;color:white;background:rgb(242 22 22);padding:3px 4px;border-radius:30px;animation:text-flicker 4s linear infinite} label.popup-notif.tIc.bIc::before{content: attr(data-text);font-size: 11px;line-height: 18px;padding: 0 5px;border-radius: 10px;background: #e6e6e6;color: var(--bodyC);position: absolute;top: -5px;right: -2px;z-index: 2;} header .navicon .popup-notif{margin-left:12px;position:relative} .wcIconNotif{position:relative;width:35px;height:35px;display:flex;left:-10px} .wcIconNotif path{fill:#444} .wcIconNotif:before{content:attr(aria-label);position:relative;display:flex;*padding:5px;font-size:8px;width:15px;height:15px;background-color:#e40101;color:#fefefe;justify-content:center;align-items:center;border-radius:50%;position:relative;top:-10px;left:26px;animation:flicker 4s linear infinite} .followBLog{background:linear-gradient(135deg,rgb(32 167 246),rgb(115 190 243));color:#fff;font-size:20px;width:45px;height:45px;border-radius:50%;margin:auto;display:flex;justify-content:center;align-items:center;animation:codepro-noti 2s 0s ease-out infinite} @keyframes codepro-noti{0%{box-shadow:0 0 0 0 rgba(74,177,255,0.5)}75%{box-shadow:0 0 0 16px rgba(148,209,255,0)}100%{box-shadow:0 0 0 0 rgba(148,209,255,0)}} .wcNotif{position:fixed;opacity:0;visibility:hidden;z-index:999999;overflow-y:auto;top:0;right:20px;border:1px solid #ddd;height:auto;width:350px;max-height:calc(100% - 110px);display:block;border-radius:16px 5px 16px 16px;color:#48525c;box-shadow:10px 10px 35px rgba(0,0,0,0.1),-10px -10px 35px rgba(0,0,0,0.1);transition:all .3s ease} .wcNotif li{border-bottom:1px solid #f1f2f4;padding:10px 10px 10px 0;display:block;align-items:center;margin:0 20px} .wcNotifStart{background:var(--contentB);padding:20px 0!important} .wcNotifStart ul{margin:0!important;padding:0;overflow:auto;box-sizing:border-box} .wcNotifStart .more{margin:5px 0 0 -5px;font-size:12px} #wcCheckPop:checked ~ .wcNotif{width:350px;visibility:visible;opacity:1;top:60px} #wcCheckPop:checked ~ .wcNotif + .fullClose{visibility:visible;opacity:1} #wcCheckPop,.wcPopMenu{display:none} .wcPopMore{display:flex;align-items:center;font-weight:900;color:#262d3d;padding:0 5px} .wcPopMore span{flex-grow:1} .accorIcon{position:relative;flex-shrink:0;display:flex;align-items:center;justify-content:center;width:12px;height:12px;margin-right:15px} .wcPopMenu:checked ~ .wcPopMore span{color:#00a8f8} .wcPopMenu:checked ~ .wcPopMore .accorIcon:before,.wcPopMenu:checked ~ .wcPopMore .accorIcon:after{background-color:#f89000} .wcPopMenu:checked ~ .wcPopMore .accorIcon:after{visibility:hidden;opacity:0} .wcNotifStart .content{position:relative;margin-left:-30px;padding-left:32px;overflow:hidden;max-height:0;transition:all .2s ease;opacity:.8} .wcPopMenu:checked ~ .content{max-height:100vh;padding-top:15px;padding-bottom:8px} /* CSS darkmode */ .drK .wcNotif,.drK .wcPopMore{color:#fefefe;border:none} .drK .wcNotif li,.drK .wcNotifStart{background:var(--darkBs);border-color:rgba(255,255,255,.1)} .drK .wcNotifClose:before{color:#d3d3d3} @media screen and (max-width:480px){#wcCheckPop:checked ~ .wcNotif{width:100%;top:0;backdrop-filter:blur(4px)}.wcNotifStart{border-radius:12px 12px 0 0;overflow:scroll}.wcNotif{min-height:100vh;width:100%;top:0;right:0;bottom:0;left:0}.wcNotifClose:before{content:'\10f057';font-family:'Font Awesome 5 Duotone';display:flex;position:relative;font-size:40px;color:#48525c;padding:10px 0;justify-content:center}} /* CSS RTL mode */ .Rtl .wcNotif{left:20px;right:auto;border-radius:5px 16px 15px 16px}Template Median 1.5
Bước 1: Thêm icon thông báo
- Đầu tiên các bạn cũng thêm svg icon giống như bên trên.
- Với template 1.5 thì phần này đơn giản hơn 1.6 một chút. Các bạn tìm thẻ
<b:tag class='headerIcon' cond='!data:view.isLayoutMode' name='div'> - Các bạn sẽ thấy trong đó có Dark mode buttton và Search button. Sau đó các bạn thêm đoạn code button thông báo dưới đây vào vị trí muốn đặt.
<label class="popup-notif" for='wcCheckPop'> <b:include name='notif-icon' /> </label>
- Mình sẽ để hình ảnh ở bên dưới để các bạn dễ hình dung.
Bước 2: Thêm HTML và CSS
Các bạn tìm thẻ <body class='' id='mainContent'> và thêm đoạn code sau vào bên dưới
<style> /* --- CSS Popup Notification --- */ #totalNotif_top{position:absolute;top:-9px;left:9px;font-size:8px;font-weight:900;color:white;background:rgb(242 22 22);padding:3px 4px;border-radius:30px;animation:text-flicker 4s linear infinite} label.popup-notif::before{content:attr(data-text);font-size:11px;line-height:18px;padding:0 5px;border-radius:10px;background:#e6e6e6;position:absolute;top:-5px;right:-4px;z-index:2} header .navicon .popup-notif{margin-left:12px;position:relative} .wcIconNotif{position:relative;width:35px;height:35px;display:flex;left:-10px} .wcIconNotif path{fill:#444} .wcIconNotif:before{content:attr(aria-label);position:relative;display:flex;*padding:5px;font-size:8px;width:15px;height:15px;background-color:#e40101;color:#fefefe;justify-content:center;align-items:center;border-radius:50%;position:relative;top:-10px;left:26px;animation:flicker 4s linear infinite} .followBLog{background:linear-gradient(135deg,rgb(32 167 246),rgb(115 190 243));color:#fff;font-size:20px;width:45px;height:45px;border-radius:50%;margin:auto;display:flex;justify-content:center;align-items:center;animation:codepro-noti 2s 0s ease-out infinite} @keyframes codepro-noti{ 0%{box-shadow:0 0 0 0 rgba(74,177,255,0.5)} 75%{box-shadow:0 0 0 16px rgba(148,209,255,0)} 100%{box-shadow:0 0 0 0 rgba(148,209,255,0)} } .wcNotif{position:fixed;opacity:0;visibility:hidden;z-index:999999;overflow-y:auto;top:0;right:20px;border:1px solid #ddd;height:auto;width:350px;max-height:calc(100% - 110px);display:block;border-radius:16px 5px 16px 16px;color:#48525c;box-shadow:10px 10px 35px rgba(0,0,0,0.1),-10px -10px 35px rgba(0,0,0,0.1);transition:all .3s ease} .wcNotif li{border-bottom:1px solid #f1f2f4;padding:10px 10px 10px 0;display:block;align-items:center;margin:0 20px} .wcNotifStart{background:#fffdfc;padding:20px 0!important} .wcNotifStart ul{margin:0!important;padding:0;overflow:auto;box-sizing:border-box} .wcNotifStart .more{margin:5px 0 0 -5px;font-size:12px} #wcCheckPop:checked ~ .wcNotif{width:350px;visibility:visible;opacity:1;top:60px} #wcCheckPop:checked ~ .wcNotif + .fullClose{visibility:visible;opacity:1} #wcCheckPop,.wcPopMenu{display:none} .wcPopMore{display:flex;align-items:center;font-weight:900;color:#262d3d;padding:0 5px} .wcPopMore span{flex-grow:1} .accorIcon{position:relative;flex-shrink:0;display:flex;align-items:center;justify-content:center;width:12px;height:12px;margin-right:15px} .wcPopMenu:checked ~ .wcPopMore span{color:#00a8f8} .wcPopMenu:checked ~ .wcPopMore .accorIcon:before,.wcPopMenu:checked ~ .wcPopMore .accorIcon:after{background-color:#f89000} .wcPopMenu:checked ~ .wcPopMore .accorIcon:after{visibility:hidden;opacity:0} .wcNotifStart .content{position:relative;margin-left:-30px;padding-left:32px;overflow:hidden;max-height:0;transition:all .2s ease;opacity:.8} .wcPopMenu:checked ~ .content{max-height:100vh;padding-top:15px;padding-bottom:8px} /* CSS darkmode */ .darkMode label.popup-notif::before{background:var(--dark-bgAlt)} .darkMode .wcNotif,.darkMode .wcPopMore{color:#fefefe;border:none} .darkMode .wcNotif li,.darkMode .wcNotifStart{background:#252526;border-color:rgba(255,255,255,.1)} .darkMode .wcNotifClose:before{color:#d3d3d3} @media screen and (max-width:480px){ #wcCheckPop:checked ~ .wcNotif{width:100%;top:0;backdrop-filter:blur(4px)} .wcNotifStart{border-radius:12px 12px 0 0;overflow:scroll} .wcNotif{min-height:100vh;width:100%;top:0;right:0;bottom:0;left:0} .wcNotifClose:before{content:'\10f057';font-family:'Font Awesome 5 Duotone';display:flex;position:relative;font-size:40px;color:#48525c;padding:10px 0;justify-content:center} } </style> <!-- [ PopUp Notification ] --> <input id='wcCheckPop' type='checkbox' /> <div class='wcNotif'> <label class='wcNotifClose' for='wcCheckPop'> </label> <div class='wcNotifStart'> <ul> <!-- noti thông báo --> <li style="border: 1px solid;display: flex;border-radius: 12px;flex-direction: row;margin-bottom:10px"> <p style="width: 70%;text-align: center;">Ấn vào nút chuông để nhận thông báo bài viết mới nhất </p> <div class="followBLog" onclick='window.open("https://www.blogger.com/follow.g?blogID=blog-id")'> <i class="fad fa-bells"> </i> </div> </li> <!-- noti 2 --> <li> <i> <!--Ngày/tháng/năm--> </i> - <!-- Tiêu đề --> <input class='wcPopMenu' id='pop-menu2' name='multi-popup' type='checkbox' /> <label class='wcPopMore' for='pop-menu2'> <span class='more'>Xem thêm </span> </label> <div class='content'> <!-- Thêm chi tiết ở đây --> </div> </li> <!-- noti 1 --> <li> <i> <!--Ngày/tháng/năm--> </i> - <!-- Tiêu đề --> <input class='wcPopMenu' id='pop-menu1' name='multi-popup' type='checkbox' /> <label class='wcPopMore' for='pop-menu1'> <span class='more'>Xem thêm </span> </label> <div class='content'> <!-- Thêm chi tiết ở đây --> </div> </li> </ul> </div> </div> <label class='fullClose' for='wcCheckPop'> </label> <script type='text/javascript'> //<![CDATA[ document.addEventListener("DOMContentLoaded", () => { document.querySelector('.popup-notif').dataset.text = document.querySelector('.wcNotifStart > *').childElementCount }); //]]> </script> Lời kết
Vậy là trong bài viết này mình đã hướng dẫn các bạn cách thêm widget thông báo vào blog, nếu có bất kì thắc mắc nào các bạn hãy để lại comment bên dưới mình sẽ giải đáp. Chúc các bạn một ngày làm việc và học tập hiệu quả!
Copyright © www.insurancefinances.com


Post a Comment
Post a Comment