I will be sharing with you, the Easiest Way to Enable Macros in Microsoft Excel.
I have taken some time to work on this post for the benefit of those who use the Microsoft Excel to work on various spreadsheet projects.
In this guide you will learn:
- What macros is all about, uses
- how to enable macros in Microsoft Excel
- how to use them to enhance your workflow
Do you know you can make your work easier and faster with the use of Macros on your Microsoft Excel? But first let's understand what Macros is all about.
What is a macro in Microsoft Excel?
I will try to make it very easy to understand the use of Macros on your excel.
We can say that, macro is a function that makes work easier by helping you automate repeated tasks which includes, calculating the sum total of marks of students in different subjects and so on.
Take take an example, on your excel document you have a spreadsheet consisting of a list of students with their scores listed in different subjects. Now, the goal is to automate the process so instead of calculating the total marks of each student one by one, you can record a macro by performing the task on one student and it will be applied to other students.
Are there Security Risks When Running Macros?
They only security risk you encounter is if you are running macros from an unverified sources. I recommend that, you enable macros whenever they are needed and keep them disabled when not in use.
How to enable macros in Microsoft Excel
Since we now know a few things about macros, follow these steps to enable it in Microsoft Excel.
1. First step is to open Microsoft Excel.
2. If you already created a spreadsheet on Excel, navigate to File and head to Options.
3. Now, Click Customize Ribbon and right under Main Tabs, check Developer. This will enable the Developer tab on the main screen.
Click Trust Center, then navigate to Trust Center Settings and then Macro Settings.
4. In this step you will choose the fourth option, Enable all macros that always let you run macros.
Note: you can disable macros, by clicking the second option: Disable all macros with notification.
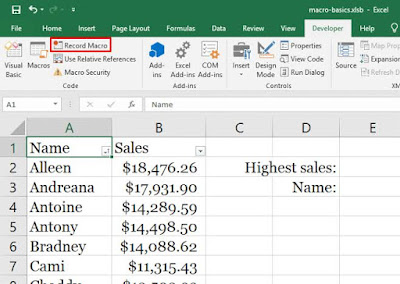
5. Now, move back to the main page and click Developer, and then click on Record Macro, you will be required to enter the macro name, enter its shortcut key and choose where you want to store the macro i.e. in the current workbook or as a common macro in your Personal Workbook.
Finally Hit OK.
Now you can start recording the commands. Once done, hit Stop Recording.
Similarly, if you are running MS Excel on a Mac, you need to repeat the same steps mentioned above.
The pros of enabling macros while using Excel on a Mac is that the Developer tab is already present in the toolbar up top. Unlike Windows 10, where you have to enable it specifically.
So now, you can run macros by hitting the assigned shortcut key while working on your spreadsheet.
Final words
We hope you learnt something new from this guide on the Easiest Way to Enable Macros in Microsoft Excel.


Post a Comment
Post a Comment