Most hosting providers now use Apache as a web server.
Compared to Apache, LiteSpeed web server has better load capacity and consume less ram.
Note: You click on here To check what your web server software is. If you want to find a hosting provider that uses LiteSpeed as a webserver, refer to HawkHost. If you use VPS, please refer to the series of articles using OpenLiteSpeed
Especially LiteSpeed web server has LiteSpeed Cache technology. According to the blog of HawkHost, enabling LiteSpeed Cache for WordPress can speed up to 33599%.
This article I will introduce more about LiteSpeed Cache and how to install LiteSpeed Cache for WordPress.
Let us begin with.
It works like Varnish Cache. But unlike Varnish Cache, LiteSpeed Cache is integrated into Litespeed webserver. Thus it handles content more efficiently with static content by eliminating a reverse proxy tier.
LiteSpeed Cache acts as an output cache for dynamic content. Cache happens to a page when the first visitor - that person can be you or anyone. Once cached, the page will load faster for everyone.
(crayon-5de37b499b075140794703 /)
This code will cache all pages in WordPress except for login, admin and cron WordPress pages. The cache time will be 120 seconds.
Disadvantages of this method:
You cannot manually delete cache. The cache also does not delete automatically when posting or updating new posts.

With this plugin you have more cache control compared to the above. This is how you should choose.
In the past, the LiteSpeed Cache plugin did not have many features compared to a paid plugin like WP Rocket.
As a result, you often have to install many other plugins such as CSS / JS optimization plugin, image loading delay plugin.
Now everything has changed:
The team behind LiteSpeed Cache has worked hard to bring powerful website acceleration features. LiteSpeed Cache now adds more acceleration features of other plugins.
At this time, there is no reason to spend money using a paid WP Rocket plugin when LiteSpeed Cache can work even better than WP Rocket on hosting using LiteSpeed Server.
Some salient features of LiteSpeed Cache:
First, install and activate LiteSpeed Cache
Next, go to Settings -> LiteSpeed Cache. You go to each tab and enable the cache features you want. Test carefully with the CSS / JS optimization features.

Note: You cannot use LiteSpeed Cache with other cache creation plugins like W3 Total Cache, WP Rocket. Please remove before using LiteSpeed Cache.
This is the test result of a website I hosted on HawkHost. Website only install LiteSpeed cache plugin as the only one that helps speed up website:

Open another browser that you are not logged into and visit your website.
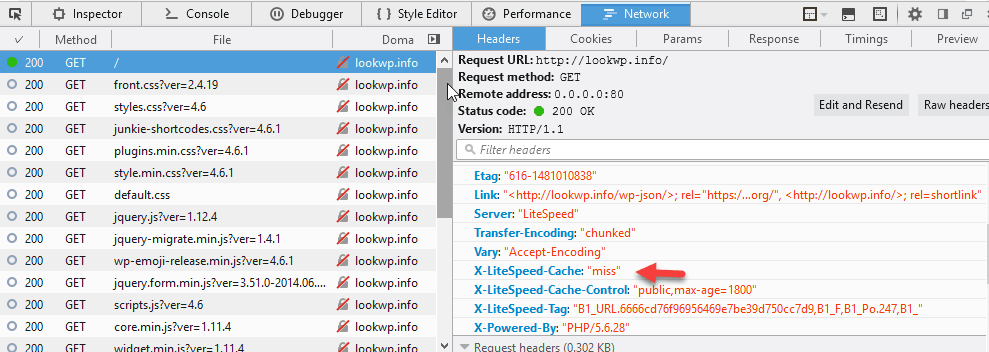
Right click and select an item like "Inspect", Then click on the"Network”. Select the first resource and see Response Headers as below

If you see "X-LiteSpeed-Cache: miss”. It means the page has been cached.
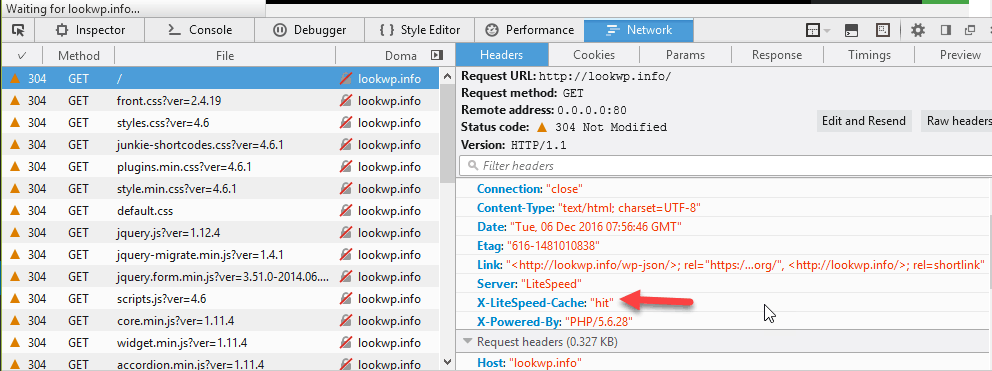
Now reload the page a second time. You will see "X-LiteSpeed-Cahce: hit" in the response header, then the page has been removed from the cache. So LiteSpeed Cache is working OK.

Did you use LiteSpeed Cache? I'd love to hear your views on LiteSpeed Cache.
If you find this article helpful, don't forget to subscribe to your blog to regularly update new articles. Thank you very much.
Icon made by http://www.flaticon.com/authors/eucalyp from www.flaticon.com
Compared to Apache, LiteSpeed web server has better load capacity and consume less ram.
Note: You click on here To check what your web server software is. If you want to find a hosting provider that uses LiteSpeed as a webserver, refer to HawkHost. If you use VPS, please refer to the series of articles using OpenLiteSpeed
Especially LiteSpeed web server has LiteSpeed Cache technology. According to the blog of HawkHost, enabling LiteSpeed Cache for WordPress can speed up to 33599%.
This article I will introduce more about LiteSpeed Cache and how to install LiteSpeed Cache for WordPress.
Let us begin with.
What is LiteSpeed Cache?
LiteSpeed is a server-level cache solution that helps your website handle large amounts of traffic. LiteSpeed Cache features like Apache mod_cache but is implemented more effectivelyIt works like Varnish Cache. But unlike Varnish Cache, LiteSpeed Cache is integrated into Litespeed webserver. Thus it handles content more efficiently with static content by eliminating a reverse proxy tier.
LiteSpeed Cache acts as an output cache for dynamic content. Cache happens to a page when the first visitor - that person can be you or anyone. Once cached, the page will load faster for everyone.
Instructions for installing LightSpeed Cache for WordPress
Method 1: Use the .htaccess file
Add the following code to the .htaccess file located in the root directory of WordPress(crayon-5de37b499b075140794703 /)
This code will cache all pages in WordPress except for login, admin and cron WordPress pages. The cache time will be 120 seconds.
Disadvantages of this method:
You cannot manually delete cache. The cache also does not delete automatically when posting or updating new posts.
Method 2: Use the LightSpeed Cache plugin

With this plugin you have more cache control compared to the above. This is how you should choose.
In the past, the LiteSpeed Cache plugin did not have many features compared to a paid plugin like WP Rocket.
As a result, you often have to install many other plugins such as CSS / JS optimization plugin, image loading delay plugin.
Now everything has changed:
The team behind LiteSpeed Cache has worked hard to bring powerful website acceleration features. LiteSpeed Cache now adds more acceleration features of other plugins.
At this time, there is no reason to spend money using a paid WP Rocket plugin when LiteSpeed Cache can work even better than WP Rocket on hosting using LiteSpeed Server.
Some salient features of LiteSpeed Cache:
- Delay loading of images / iframes
- Asynchronous CSS / JS loading
- Combine CSS, Javascript
- HTTP / 2 Push for CSS and JS (pre-loads CSS, JS when website uses HTTP / 2 protocol)
- Clean up and optimize the database
- Browser Cache
- Support CDN
First, install and activate LiteSpeed Cache
Next, go to Settings -> LiteSpeed Cache. You go to each tab and enable the cache features you want. Test carefully with the CSS / JS optimization features.

Note: You cannot use LiteSpeed Cache with other cache creation plugins like W3 Total Cache, WP Rocket. Please remove before using LiteSpeed Cache.
This is the test result of a website I hosted on HawkHost. Website only install LiteSpeed cache plugin as the only one that helps speed up website:

Check if WordPress LiteSpeed Cache is working or not
In the browser you are logged in, clear the cache.Open another browser that you are not logged into and visit your website.
Right click and select an item like "Inspect", Then click on the"Network”. Select the first resource and see Response Headers as below

If you see "X-LiteSpeed-Cache: miss”. It means the page has been cached.
Now reload the page a second time. You will see "X-LiteSpeed-Cahce: hit" in the response header, then the page has been removed from the cache. So LiteSpeed Cache is working OK.

Epilogue
So, you already know how to install LiteSpeed Cache in WordPress. Your website now takes advantage of the caching power of LiteSpeed server.Did you use LiteSpeed Cache? I'd love to hear your views on LiteSpeed Cache.
If you find this article helpful, don't forget to subscribe to your blog to regularly update new articles. Thank you very much.
Icon made by http://www.flaticon.com/authors/eucalyp from www.flaticon.com


Post a Comment
Post a Comment