So, here is a beautiful customizable and colored popular post that you can embed in your Blogger blog to make your blog more attractive and that catches your reader’s eye and ultimately increase your site engagement.
Just follow the simple steps below:
There are mainly three methods to display popular post on your blog.
- 1. Display only post title
- 2. Display title with image thumbnails and snippets
- 3. Display post title with image thumbnail and
- 4. Display title with snippets.
In order to add these customizable multi-colored popular posts widget, you have to add some new variables and CCS codes to your Blogger template. So, let’s get started:
Step 2. Click anywhere inside the HTML scripts area and search by pressing Control + F together and type the following text.
Variable definitions
Note: If you cannot find the above text, past the below code in the search box.
<b:skin><![CDATA[/*
......and this should end up with a similar line like below.
----------------------------------------------- */
Step 4. Copy the below code and past just after this tag next to the code.
 <Group description="PopularPosts Backgrounds" selector="#PopularPosts1">
 <Variable name="PopularPosts.background.color1" description="background color1" type="color" default="#fa4242" value="#ff4c54"/>
 <Variable name="PopularPosts.background.color2" description="background color2" type="color" default="#ee6107" value="#ff764c"/>
 <Variable name="PopularPosts.background.color3" description="background color3" type="color" default="#f0f" value="#ffde4c"/>
 <Variable name="PopularPosts.background.color4" description="background color4" type="color" default="#ff0" value="#c7f25f"/>
 <Variable name="PopularPosts.background.color5" description="background color5" type="color" default="#0ff" value="#33c9f7"/>
 </Group>
Step 5. So, you have added the variables that made you change the colors and now search for the below tag.
]]></b:skin>
Step 6. Copy and paste the below code just above the above code.
 #PopularPosts1 ul{margin:0;padding:5px 0;list-style-type:none}
 #PopularPosts1 ul li{position:relative;margin:5px 0;border:0;padding:10px}
 #PopularPosts1 ul li:first-child{background:$(PopularPosts.background.color1);width:90%}
 #PopularPosts1 ul li:first-child:after{content:"1"}
 #PopularPosts1 ul li:first-child + li{background:$(PopularPosts.background.color2);width:85%}
 #PopularPosts1 ul li:first-child + li:after{content:"2"}
 #PopularPosts1 ul li:first-child + li + li{background:$(PopularPosts.background.color3);width:80%}
 #PopularPosts1 ul li:first-child + li + li:after{content:"3"}
 #PopularPosts1 ul li:first-child + li + li + li{background:$(PopularPosts.background.color4);width:75%}
 #PopularPosts1 ul li:first-child + li + li + li:after{content:"4"}
 #PopularPosts1 ul li:first-child + li + li + li + li{background:$(PopularPosts.background.color5);width:70%}
 #PopularPosts1 ul li:first-child + li + li + li + li:after{content:"5"}
 #PopularPosts1 ul li:first-child:after,#PopularPosts1 ul li:first-child + li:after,#PopularPosts1 ul li:first-child + li + li:after,#PopularPosts1 ul li:first-child + li + li + li:after,#PopularPosts1 ul li:first-child + li + li + li + li:after{position:absolute;top:20px;right:-15px;border-radius:50%;background:#353535;width:30px;height:30px;line-height:1em;text-align:center;font-size:28px;color:#fff}
 #PopularPosts1 ul li .item-thumbnail{float:left;border:0;margin-right:10px;background:transparent;padding:0;width:40px;height:40px}
 #PopularPosts1 ul li a{font-size:12px;color:#444;text-decoration:none}
 #PopularPosts1 ul li a:hover{color:#222;text-decoration:none}
Step 7. Search for the below code.
<b:widget id='PopularPosts1' locked='false' title='Popular Posts' type='PopularPosts'>
Step 8. Delete it until you see the below tag (delete the
</b:widget>tag as well)
</b:widget>tag as well)
</b:widget>
Note: Be very careful when removing it and thus the entire fragment of the code should look like below.
<b:widget id='PopularPosts1' locked='false' title='Popular Posts' type='PopularPosts'>
<b:includable id='main'>
<b:if cond='data:title'><h2><data:title/></h2></b:if>
<div class='widget-content popular-posts'>
<ul>
<b:loop values='data:posts' var='post'>
<li>
<b:if cond='data:showThumbnails == "false"'>
<b:if cond='data:showSnippets == "false"'>
<!-- (1) No snippet/thumbnail -->
<a expr:href='data:post.href'><data:post.title/></a>
<b:else/>
<!-- (2) Show only snippets -->
<div class='item-title'><a expr:href='data:post.href'><data:post.title/></a></div>
<div class='item-snippet'><data:post.snippet/></div>
</b:if>
<b:else/>
<b:if cond='data:showSnippets == "false"'>
<!-- (3) Show only thumbnails -->
<div class='item-thumbnail-only'>
<b:if cond='data:post.thumbnail'>
<div class='item-thumbnail'>
<a expr:href='data:post.href' target='_blank'>
<img alt='' border='0' expr:height='data:thumbnailSize' expr:src='data:post.thumbnail' expr:width='data:thumbnailSize'/>
</a>
</div>
</b:if>
<div class='item-title'><a expr:href='data:post.href'><data:post.title/></a></div>
</div>
<div style='clear: both;'/>
<b:else/>
<!-- (4) Show snippets and thumbnails -->
<div class='item-content'>
<b:if cond='data:post.thumbnail'>
<div class='item-thumbnail'>
<a expr:href='data:post.href' target='_blank'>
<img alt='' border='0' expr:height='data:thumbnailSize' expr:src='data:post.thumbnail' expr:width='data:thumbnailSize'/>
</a>
</div>
</b:if>
<div class='item-title'><a expr:href='data:post.href'><data:post.title/></a></div>
<div class='item-snippet'><data:post.snippet/></div>
</div>
<div style='clear: both;'/>
</b:if>
</b:if>
</li>
</b:loop>
</ul>
<b:include name='quickedit'/>
</div>
</b:includable> Step 9. After deleting the above code, paste the following in its place.
<b:widget id='PopularPosts1' locked='false' title='Popular Posts' type='PopularPosts'>
<b:includable id='main'>
<b:if cond='data:title'>
<h2><data:title/></h2>
</b:if>
<div class='widget-content popular-posts'>
<ul>
<b:loop values='data:posts' var='post'>
<li>
<b:if cond='data:showThumbnails == "false"'>
<b:if cond='data:showSnippets == "false"'>
<a expr:href='data:post.href' expr:title='data:post.title' rel='bookmark'><data:post.title/></a>
<b:else/>
<a expr:href='data:post.href' expr:title='data:post.snippet' rel='bookmark'><data:post.title/></a>
</b:if>
<b:else/>
<b:if cond='data:showSnippets == "false"'>
<b:if cond='data:post.thumbnail'>
<img class='item-thumbnail' expr:alt='data:post.title' expr:src='data:post.thumbnail'/>
<b:else/>
<img alt='no image' class='item-thumbnail' src='https://blogger.googleusercontent.com/img/b/R29vZ2xl/AVvXsEgQVrGncpvKjV22Cc19RQ42jpW6uLKKA6zBRzVMGgPeZ3wKfFrcVYDxhpYLuqWCubBkU-SN6cOtmzOnmfCjI0xS4eOQzSESfjeZWhmjS57wp8K11s8nL2ZKdZr0hb934Pu5ajCQ9aVXsS4/s1600/default.jpg'/>
</b:if>
<a expr:href='data:post.href' expr:title='data:post.title' rel='bookmark'><data:post.title/></a>
<div class='clear'/>
<b:else/>
<b:if cond='data:post.thumbnail'>
<img class='item-thumbnail' expr:alt='data:post.title' expr:src='data:post.thumbnail'/>
<b:else/>
<img alt='no image' class='item-thumbnail' src='https://blogger.googleusercontent.com/img/b/R29vZ2xl/AVvXsEgQVrGncpvKjV22Cc19RQ42jpW6uLKKA6zBRzVMGgPeZ3wKfFrcVYDxhpYLuqWCubBkU-SN6cOtmzOnmfCjI0xS4eOQzSESfjeZWhmjS57wp8K11s8nL2ZKdZr0hb934Pu5ajCQ9aVXsS4/s1600/default.jpg'/>
</b:if>
<a expr:href='data:post.href' expr:title='data:post.snippet' rel='bookmark'><data:post.title/></a>
<div class='clear'/>
</b:if>
</b:if>
</li>
</b:loop>
</ul>
</div>
</b:includable>
</b:widget> Step 10. Click on Save to save your template.
Multi-colored popular posts widget settings
Go to Layout and click the Edit link on the popular posts widget.
Select to display up to 5 posts and save your popular posts widget.
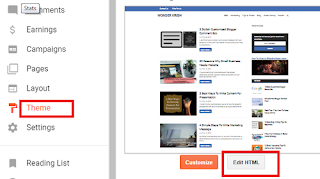
You can easily change the background color of your popular posts widget by going to Template and then clicking on Customize button and go to your Advanced tab.
Where you will find the Popularpostbackground title from where you can select any color as your desire or that best suits your blog theme color.
If you have successfully implemented the multi-colored popular post widget for your Blogger blog and enjoy reading my blog post, then please subscribe for more tutorial or for any questions or suggestions, leave a comment below.


Post a Comment
Post a Comment